
Just bought your first heated vest? Staring at it like it’s mission control? You’re not alone.
That sleek battery pack and button setup can feel intimidating. Picture this: 6 AM in your cold garage, craving warmth. The tech looks complex.
Here’s the truth: turning on a heated vest takes about 30 seconds once you know the sequence. Those 30 seconds separate cozy confidence from frustrating returns.
Maybe your USB connection won’t click. Or those indicator lights do nothing. Or you can’t find the power button hiding in the inner pocket. This guide breaks down the exact activation process for every major heated vest type.
You’ll learn the essential three-step startup. We decode those blinking LED patterns—they mean something specific. You’ll troubleshoot the most common “won’t turn on” problems. Plus, we show you how to nail temperature settings. No more sweating through your base layer. No more shivering from the wrong heat level.
No fluff. No manual-speak. Just the practical walkthrough that gets you from cold to comfortable.
Content Framework for “How To Turn On Heated Vest”
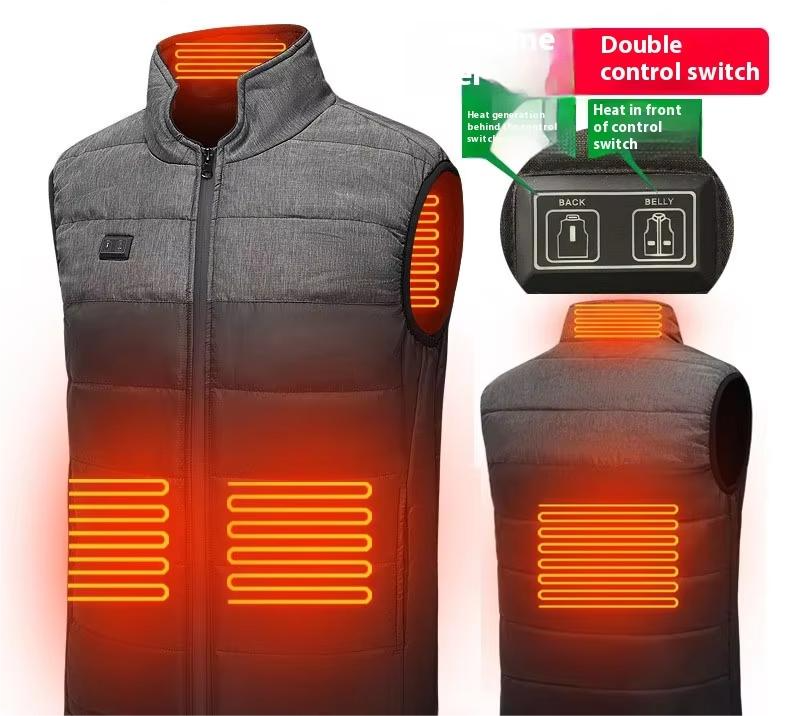
Every heated vest works the same way: prep the battery, make the connection, activate heating. Master this pattern and you’ll handle any model.
Battery Setup First
Charge your battery pack fully before the first use. Find the pocket—it’s inside the vest near the hem. Slide the battery in. Locate the DC output port. Connect the power cable from your battery straight into this port. This connection powers everything.
The 10-Second Window
Plug that vest cable into your battery pack. The power button starts blinking right away. This blink matters. You’ve got a 10-second window to activate the vest before it enters sleep mode. Miss it? Unplug and reconnect.
Press and Hold
Press and hold the power button for 2-3 seconds. The exact timing varies by brand. ARRIS and 32 Degrees need 3 seconds. Generic models often need just 2. The button light goes from blinking to solid. You’re live. Heating elements warm up within 15 seconds.
Reading Your Heat Levels
Tap that power button to cycle through settings. Most vests use color codes: red = high (around 70°C), yellow = medium (around 55°C), green = low (around 40°C). Start low. Increase if needed. Your body heat gets trapped inside. You need less power than you think.
Some models give you more control. ARRIS offers multi-zone control. You get separate buttons for chest, back, and collar areas. ORORO builds in “Boost mode” for maximum heat bursts.
Quick Start: Turn On Your Heated Vest in 3 Steps
Most heated vests work the same way. You need three basic moves. This works for a $50 generic model or a $200 premium brand.
Step 1: Charge and Connect Your Battery
Pull out your battery pack. Charge it fully before first use—this helps your battery last longer. Find the vest’s interior pocket. Most pockets sit near the hem or left side. Slide the battery inside. Look for the power cable hanging in that pocket. Plug it into your battery’s DC output port. The connection feels snug. You’ll hear it click.
Step 2: Activate Within 10 Seconds
Find your vest’s HEAT button. Most brands put it on your left chest or stomach area. It blinks right after you connect the battery. Press and hold this button for 2-3 seconds. Generic brands need 2 seconds. 32 Degrees and ARRIS vests need the full 3 seconds. The blinking light goes solid. Heating mode is on.
Miss that 10-second window? The battery goes to sleep. Unplug the cable. Wait 5 seconds. Plug it back in and try again.
Step 3: Set Your Temperature
Tap the HEAT button to change heat levels. The color codes are simple: Red delivers 140°F (high heat), Yellow hits 130°F (medium), Green maintains 122°F (low). Start on green. Your body heat stays trapped inside the vest. You’ll warm up faster than expected.
Heat elements hit target temperature in 3-5 minutes. Touch your chest or back area—you’ll feel it working.
Step 1: Charge and Connect the Battery Pack
Your battery pack controls everything. A dead battery means no heat. A bad connection means failures during your trip.
Charge it fully before first use. Plug the charger straight into a wall outlet. Skip the power strip. Skip the extension cord. These extras slow charging and can cause overheating. The battery needs 3-4 hours for a full charge. The charger light switches from red to green when done.
Temperature affects charging. Don’t charge in freezing garages or hot cars. Keep it between 32°F and 105°F. Cold batteries from outdoor use need a two-hour warmup at room temperature first. This stops damage to battery cells.
Stay nearby while charging. Battery fires are rare but they happen. Watch for warning signs: strange smells, too much heat, bulging cases, or hissing sounds. See any of these? Disconnect right away. Keep your charging spot away from bedrooms, exits, and flammable items. A kitchen counter beats a bedroom nightstand.
Making the connection is simple. Find the interior pocket in your vest. It’s on the left side near the hem. The power cable sits inside this pocket. It’s attached to the vest’s heating system. Slide your charged battery into the pocket. Find the DC output port on your battery. It’s the round connector. Different from the charging port. Push the vest’s cable connector into this port. Press hard. You should feel and hear a solid click.
The indicator light on your battery starts blinking. This blink shows a good connection. You’ve got power. You’re ready for activation.
Step 2: Locate and Press the Power Button
The power button hides in predictable spots. Check your vest’s left chest area first—that’s where 70% of manufacturers put it. Look for a small circular or rectangular button with a rubber coating for grip. The button sits inside a protective plastic housing. This prevents accidental presses.
Can’t find it on the chest? Try the stomach area on your left side. Budget brands like KEMIMOTO and generic Amazon models place buttons lower. This makes them easier to reach while seated. Premium brands—ORORO, Venustas, ARRIS—stick to chest placement for cleaner aesthetics.
The button has texture. Run your fingers along the left side seam. You’ll feel a raised bump. That’s your power control. Some vests label it HEAT or stamp a flame icon next to it. Others use nothing but a small dot. The button connects to wires. You can see them through the vest lining if you peek inside.
The Activation Sequence
Press and hold. Don’t tap. Hold the button for 2-3 seconds straight. Your thumb needs firm pressure—lighter than opening a soda can, harder than clicking a pen. The button pushes in about 2mm. You’ll feel resistance.
Watch the LED indicator while pressing. It blinks right away on contact. Keep holding until the blinking stops and the light goes solid. That transition—blink to solid—confirms activation. Release too soon and nothing happens. The vest stays cold. You’ll need to start over.
Generic vests need 2 seconds. Premium brands build in longer timers. 32 Degrees requires 3 seconds. ARRIS needs 3.5 seconds for safety. Check your product manual for exact timing. Not sure? Hold for a full 4 seconds. Extra time won’t hurt anything.
The heating elements activate within 15 seconds of that solid light. Touch your chest or back through the fabric. You’ll notice warmth spreading from the center outward. That’s the carbon fiber heating panels doing their job.
Step 3: Adjust Heat Settings and Temperature Levels
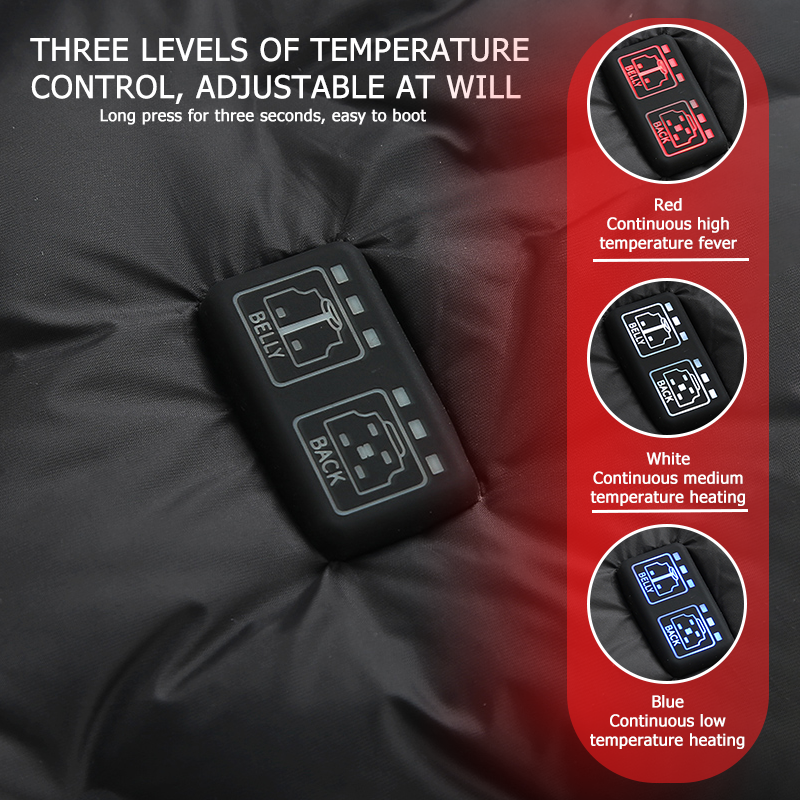
Your vest gives you three heat levels. Each one serves a different purpose. Tap the power button once to cycle through them. The button light changes color with each tap. That’s your temperature indicator.
Red means high heat. This setting pushes around 140°F (60°C) into the heating zones. Use it for brutal cold—think below 20°F weather or standing still outdoors. Your battery drains fastest here. You’ll get 2-3 hours of runtime on most 10,000mAh packs.
Yellow signals medium heat. The sweet spot for most users. Around 130°F (54°C) keeps you comfortable. Shoveling snow? Hiking? Commuting? This works. It balances warmth and battery life. Expect 4-5 hours of continuous heat.
Green delivers low heat. The maintenance mode at 122°F (50°F). Perfect for mild cold (40-50°F) or indoor use. Your body heat stays trapped inside the vest anyway. This gentle warmth stops overheating. Plus, battery life extends to 6-8 hours.
Start Low, Adjust Up
Don’t blast red right away. Begin on green. Wait 3-5 minutes. The heating elements need time to warm your core. Your vest traps that warmth against your body. Green works for temperatures down to 35°F.
Feeling cold still? Tap up to yellow. Give it another 5 minutes before judging. The cumulative effect matters more than instant blast heat. Jump to red for extreme cold or standing motionless outdoors.
Activity changes everything. Walking the dog? Stay on green. Sitting at a football game? Yellow or red makes sense. Shoveling the driveway? Drop back to green within 10 minutes. You’ll sweat otherwise.
Toggle down as you warm up. No point burning battery once you’re comfortable.
Brand-Specific Activation Instructions

Each brand builds its heated vest in its own way. The power button location changes. Hold times differ. LED patterns vary too. Here’s what works for the major brands.
ORORO Heated Vests
ORORO places the power button on your left chest. It’s small and circular with a rubber surface. Press and hold for 3 seconds. The button LED cycles through colors right away—red, white, blue. Release at your preferred color. Red gives maximum heat at 131°F. White provides medium at 113°F. Blue keeps it low at 104°F.
ORORO includes a Boost Mode for emergency warmth. Press and hold for 5 seconds straight. The button flashes red fast. This pushes all zones to max output for 10 minutes. Then it drops back to your last setting. Your battery drains fast in Boost—use it when you need it.
The battery pocket sits on the lower left interior. ORORO batteries have two ports. The round DC port powers your vest. The USB port charges your phone. Don’t mix them up. The vest cable fits the DC port.
Venustas Multi-Zone Vests
Venustas puts dual-control systems in premium models. You get two power buttons. One controls upper zones (chest and collar). The other handles lower zones (back and sides). Each button works on its own. The buttons sit on opposite sides of the chest for easy reach.
Press each button one at a time. Hold for 2.5 seconds. The upper button glows red, yellow, or blue. The lower button uses the same colors. Mix settings how you like. Red upper with blue lower works great for windy conditions. Your core stays warm. Your back doesn’t overheat.
First-time users see a pre-heat sequence. Connect your battery. The buttons blink amber for 90 seconds. This primes the heating elements. Wait for solid color before you adjust settings. Skip this wait and heating stays uneven.
ARRIS Zone Control Technology
ARRIS gives you three separate buttons on select models. Chest control sits center-left. Back control hides on the right side seam. Collar control (if included) sits near the zipper at neck height. Each zone runs on its own.
The activation works a bit different. Press the main chest button first. Hold for 3 seconds. This powers the whole system. Then turn on other zones one by one with 2-second presses. Each button lights up in your chosen color—red (high), orange (medium), green (low).
ARRIS batteries use smart detection. Plug in your battery and wait. The vest finds which zones have heating elements. Those buttons light up. This stops confusion on models with fewer zones.
Generic and Budget Models
Amazon basics and unbranded vests share common designs. Single button placement varies a lot. Check left chest, stomach area, or right interior pocket. Most use 2-second activation. The LED shows three colors: red, blue, white. Temperature ranges hit 122°F (low), 131°F (medium), 140°F (high).
Watch for quality issues. Cheap buttons stick or need multiple presses. The LED might show wrong colors—white appears after you selected red. Budget batteries enter sleep mode faster. You get a 5-second window instead of 10 seconds for activation.
Test your vest indoors first. Make sure the button responds. Check that heating elements warm up the same across zones. Verify color changes match temperature increases. Return faulty units fast—generic brands don’t troubleshoot well.
Multi-Zone Heated Vests: Advanced Controls
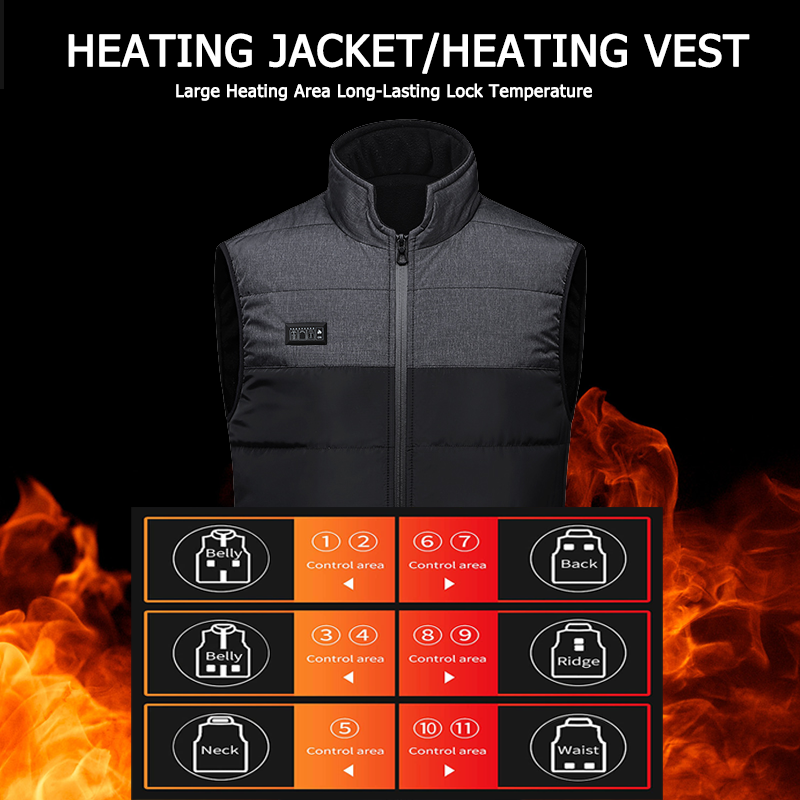
Premium heated vests split warmth into separate zones you can control. Your chest runs hot. Your back stays moderate. Your collar blasts heat. Your core stays comfortable. This beats the old “one button fits all” approach.
ORORO’s three-zone system targets left pocket, right pocket, and upper back. Each zone gets power from the same battery. Each runs on its own circuit. The single button on your left chest cycles through zone combinations. Press once—left pocket heats. Press twice—both pockets heat. Press three times—all zones activate, back included. Press four times—back alone. The button LED shows which zones are live. Different blink patterns tell you.
Milwaukee M12 gives you dual-zone independence. Chest and back zones operate as separate units. You get two control buttons—one for chest, one for back. Set chest to red (high). Keep back on blue (low). Great for windy jobsites. Your front needs protection. Your back overheats from movement. The zippered battery pocket moves between front and back positions. Slide it to the back for counterweight. Keep it front for easy access.
Advanced models like the ORORO Classic Pro offer seven separate zones. Back, shoulders, collar, and pockets all heat on their own. You need the companion app for full control. The button system can’t handle seven zones well. The app shows battery drain per zone. Turn off zones you don’t use. This extends runtime. Most users keep 3-4 zones active at once.
Battery life changes a lot with multi-zone use. ORORO’s 4800mAh pack runs 10 hours on single-zone low. Activate all three zones on high? You get 3 hours max. Milwaukee’s larger M12 batteries push 8 hours on low single-zone. Both zones on max at the same time? That drops to 2 hours. The math is simple: more active zones eat more power per minute.
Zone priority matters during long days. Start your morning with all zones active on medium. After an hour, your body traps heat. Drop pocket zones to low or turn them off. Keep back and chest zones running. This doubles your battery life. You still get core warmth where it counts.
Color-coded feedback helps you track zone status at a glance. Blue means that zone runs cool. White signals medium. Red shows max output. Premium vests display all active zones at once through multi-color LEDs. Budget multi-zone vests blink one by one—harder to read but they work.
Milwaukee’s HEXON HEAT TECHNOLOGY speeds up heat time in multi-zone setups. All zones hit target temperature within 60 seconds. That’s faster than ORORO’s carbon nanotube elements. Those need 90-120 seconds. The trade-off? Milwaukee vests cost $80-100 more. They need proprietary M12 batteries. Those run $60-90 each.
Zone control works great in sub-zero conditions. Keep your collar zone on red for face warmth. Set back zones to medium for core heat. Drop pocket zones off—your hands stay in gloves. This targeted approach fights frostbite where you’re most at risk. You still conserve battery for 6+ hour shifts in extreme cold.
Troubleshooting: Heated Vest Won’t Turn On
Your vest won’t power up. The button does nothing. The battery sits there, mocking you with silence.
Start with the simple fixes first.
Dead Battery or Low Charge
Your battery might show full but still be empty. Lithium batteries lie sometimes. Test it with your phone or another USB device. That device won’t charge either? Your battery is dead. Replace it.
Found a battery that responds? Plug it into the wall charger for 1-5 minutes. Even a tiny charge can trigger the indicator light. A blinking light means it’s accepting power. Your battery works—it just needs juice.
Some battery packs enter sleep mode after sitting unused. Tap the side button once. This wakes it up. The LED should light up. Now connect it to your vest and try again.
Use compatible batteries. Generic replacements from Amazon often lack the right voltage output. Your vest needs 7.4V or 5V depending on the model. Wrong voltage means no heat. Get manufacturer-approved batteries or exact voltage matches.
Connection Problems Kill Power Flow
Unplug your power cable from the battery. Look at both ends. Check for cracks, exposed wires, or bent pins. Damaged cables can’t send power through.
Now plug the cable back in. Push hard into the DC port on your battery. You need to feel and hear a click. Round DC sockets require firm pressure. A loose connection triggers blinking lights that disappear fast. That’s your clue—reseat the cable until it clicks tight.
Try the cable with a phone wall charger if your battery has USB output. Does your phone charge? The cable works. It won’t charge? Replace the cable right away.
Match your port type. USB ports and DC ports look different. USB is flat and rectangular. DC is round with a center pin. Forcing the wrong cable into the wrong port damages both. Double-check before you push.
Button Won’t Respond Despite Good Connections
You’ve got a charged battery. The connection clicks tight. The button still does nothing.
Hold the power button for 3-5 seconds straight. Not 2 seconds. Not a quick tap. A full 3-5 count. Premium vests use longer timers than budget models. Your thumb pressure should be firm and steady.
Watch for LED response. It should flash red, white, and blue during activation. Or show a solid red light. Any color response means the button works. No lights at all? The button circuit might be broken. Contact your manufacturer with your order number ready.
The Five-Minute Preheat Requirement
ORORO and similar smart vests run a preheat cycle before delivering warmth. Connect your battery. Hold the button for 3 seconds. You’ll see a red light. The vest heats for 5 minutes on high by itself. Then it switches to medium heat with a white blinking light.
Don’t check for warmth during those first 5 minutes. The elements need time to reach temperature. Zip up your vest and wait a full 5-10 minutes. Heat builds over time. Testing too soon makes you think it’s broken.
Turn your vest on 10 minutes before you head outside. This gives the preheat time to finish. You’ll step into ready warmth instead of waiting in the cold.
Check Battery Placement
Pull your battery out of the interior pocket. Look inside. Some pockets have warning labels—”DO NOT PLACE BATTERY ON HEATING ELEMENT.”
The battery needs to sit in the right pocket. Putting it straight against heating panels causes the thermal cutoff to trigger. Your vest shuts down for safety. Move the battery to the correct spot. Try powering on again.
Partial Heat or Cold Zones
Your vest powers on. The LED shows the right color. But some areas stay cold while others warm up.
Touch each heating zone after 5 minutes of runtime. Chest, back, collar—feel them all. Surface temperature runs lower than you expect. Vests regulate heat through fabric layers. Use a thermometer if your hand can’t tell. Aim for 100°F minimum on the fabric surface.
Found cold zones that stay cold? Your heating elements failed in those areas. This isn’t your fault. The carbon fiber circuits broke during manufacturing or shipping. Contact support for warranty replacement. Most brands swap out broken units within 30 days.
When All Else Fails
You’ve tried everything. Battery works. Connections click. Button responds. Still no heat.
Record a short video showing the problem. Film yourself connecting the battery, pressing the button, and showing the LED response (or lack of it). Have your order number ready. Check the care label inside your vest for the serial number.
Email or call manufacturer support with this evidence. Most companies offer exchange or refund within warranty periods. Video proof speeds up the replacement process.
Try a different compatible battery if you have access to one. Borrow from a friend with the same vest brand. This shows whether your battery or vest unit failed. Swap tests save time with customer service.
Safety Tips for First-Time Use
Heated vests pack lithium batteries and heating elements against your skin. This mix needs careful handling. Good prep stops burns, battery fires, and damaged gear.
Inspect Everything Before You Power On
Pull your vest out of the packaging. Flip it inside out. Run your fingers along every seam where heating elements sit. Feel for hard lumps, wire breaks, or loose connections. Carbon fiber heating panels should feel flat and smooth—no bunching or gaps. Found damage? Stop. Contact the seller right away. Don’t plug in broken elements.
Check your battery pack next. Look for cracks, dents, or swelling on the case. A swollen battery means internal damage. It can overheat or catch fire. Dispose of it at a safe location. Most cities have battery recycling drop-off sites. Never use a damaged battery just because you spent money on it.
Look at both ends of your power cable. Bent pins? Exposed copper wire? Frayed insulation? Any of these stop safe use. Replace damaged cables before first use. Generic replacements from Amazon cost $8-12. Original manufacturer cables run $15-20 but match your vest’s voltage needs.
Start Cold, Test Warm
Never turn on your vest while wearing it the first time. Lay it flat on a surface that won’t burn—kitchen counter, concrete floor, metal table. Plug in your charged battery. Hold the power button for 3 seconds. Set it to low (green). Walk away for 10 minutes.
Come back and touch each heating zone through the fabric. They should feel warm—around 100-110°F. Not hot enough to hurt bare skin. Uneven heating is normal. Center zones warm faster than edges. But cold zones mean broken elements. Return the vest if you find dead spots.
Your first wearing session should stay short. 15 minutes maximum. Set the vest to low. Zip it over a shirt—never against bare skin. Walk around your house. The warmth builds slowly. You’ll notice it most in your core and upper back. Feel too much heat after 5 minutes? Power down. You might have sensitive skin or the vest runs hot.
Understand Your Skin’s Heat Tolerance
Your body can’t feel burns forming under 113°F. But long contact with 120°F heat causes first-degree burns after 30 minutes. High setting on most vests hits 135-145°F. That’s burn range if you press the vest tight against skin for long periods.
Use a base layer. A base layer shirt creates key air space between heating elements and your body. This spreads heat out and stops hot spots. Skip the base layer on high settings and you risk red marks or mild burns—your spine gets the most heat because the vest sits close there.
Watch for warning signs during use. Heavy sweating means you’re too hot. Tingling or numbness under the vest shows poor blood flow or heat stress. Sharp pain anywhere? Power off right away and remove the vest. Red marks that last more than 20 minutes after removal mean you’re running too hot.
Battery Safety Is Non-Negotiable
Never charge your battery overnight without watching it. Lithium batteries can fail during charging. Heat buildup happens fast—the battery heats up, catches fire, and spreads flames to nearby materials. Charge your battery on a clear counter. Stay in the same room. Unplug it once the indicator shows full.
Keep charged batteries away from metal objects. Keys, coins, tools—these can short the battery terminals. A shorted battery can catch fire in seconds. Store your battery in its own pocket or a protective case. Never toss it loose in a toolbox or backpack with metal items.
Hot and cold temps ruin batteries for good. Don’t leave your battery pack in a freezing car overnight. Don’t charge it in a hot garage. Operate between 32°F and 104°F. Store between 50°F and 77°F for longest life.
Know When NOT to Use Your Heated Vest
Skip your heated vest during hard work. Shoveling snow? Hiking uphill? Your body makes plenty of heat on its own. Adding electric heat on top causes risky overheating. Core temperature jumps. You sweat a lot. That sweat soaks your base layer and vest interior. Wet heating elements can short out or rust.
Never use a heated vest while sleeping. You can’t watch heat levels while asleep. Long contact with heating elements causes burns during sleep. Plus, tossing and turning can damage the battery connection or bend power cables.
Don’t wear your heated vest during medical scans. MRI machines and heated vests don’t mix. The magnetic field pulls on metal parts in your battery and heating elements. This damages expensive equipment and puts you at risk.
Battery Life and Runtime by Heat Level
Your battery’s lifespan changes with temperature and heat settings. Push your vest to red every time? You’re killing that battery faster than you think.
Temperature hurts battery life in two ways. Heat your vest in 86°F weather? Your battery’s cycle life drops 20% compared to room temperature use. Crank it up to 104°F and that drop doubles to 40%. Hit 113°F and you’ve cut your battery’s total lifespan in half. Higher temps create more resistance inside. Energy efficiency drops. You get shorter run times per charge.
Cold weather damages batteries too. At freezing (32°F), your lithium-ion battery’s resistance jumps 42% higher than normal. Capacity falls from 2.82 Ah to 2.68 Ah—that’s a 5% performance drop right there. Ions move slower. Your battery drains faster. That 6-hour battery becomes a 4-hour battery in cold weather, right when you need it most.
Your heat setting choice makes this worse. Red setting (140°F) drains a 10,000mAh battery in 2-3 hours. Yellow (130°F) stretches that to 4-5 hours. Green (122°F) pushes 6-8 hours. Start on green. Your body heat gets trapped anyway. You’ll stay warm longer and save battery cycles for later.
How to Turn Off Your Heated Vest
Turning off works like starting up, with one key change: hold the button longer. Press and hold your power/HEAT button for 3 full seconds. Watch the LED indicator. It will dim and go dark. That’s your signal. Heat stops. Power cuts off.
Some brands need less time. Milwaukee takes just 1-2 seconds. TideWe and AKASO work the same way. 32 Degrees needs the full 3-second hold. Check your manual once. Remember the timing. You’ll know it by heart after that.
Can’t find the button in the dark? Unplug the battery from the vest cable. Power cuts right away. AKASO, iHood, and Kemimoto users do this all the time without problems. The heating parts cool down within 90 seconds after you unplug.
Remove Your Battery Right Away
Don’t leave your battery plugged in after you turn off the vest. Pull it out of the interior pocket. Disconnect the cable from the battery’s DC port. Store the battery in a cool, dry spot—between 50-77°F works best.
Most batteries enter auto-shutdown mode 10 seconds after you power off the vest. But leaving them connected drains small amounts of power overnight. This slow drain builds up over weeks. Your battery loses charge just sitting there.
Conclusion
Turning on your heated vest takes just three steps: charge the battery, press the power button, and pick your heat level. No engineering degree needed. USB vest or multi-zone model with advanced controls? Either way, you’ll stop fumbling with frozen fingers once you nail these basics.
Here’s what matters most: charge it completely before first use. Watch those indicator lights to avoid mid-adventure shutdowns. Don’t skip the safety checks. Your heated vest works as well as you maintain the battery.
Still having issues? Check the troubleshooting section. Most problems come from loose connections or dead batteries. Both take less than a minute to fix.
Ready to upgrade your cold-weather game? Bookmark this guide for quick reference. Explore our complete heated vest collection to find the perfect model for your lifestyle. Staying warm shouldn’t be complicated. It should be as easy as pressing a button. Get out there and enjoy winter.