
Ever wondered how a simple vest keeps you warm for hours? No bulky layers. No fire risk. Modern heated vests changed cold-weather comfort. They use carbon fiber heating parts, rechargeable batteries, and smart temperature controls.
You’re shopping for your first heated vest? Or maybe you’re just curious about the tech that turns electric power into steady, body-warming heat. Either way, knowing how these garments work clears up the mystery. And the doubt.
This guide breaks down the complete heating process. You’ll see how the battery pack converts voltage. You’ll learn how heat spreads across key warming zones. This tech became a game-changer for outdoor lovers, workers, and anyone who’s tired of winter shivers.
You’ll discover the science behind infrared heating. You’ll learn why quality heat-keeping fabric matters. Plus, you’ll get the technical know-how to choose a heated vest that fits your needs.
Basic Working Principle
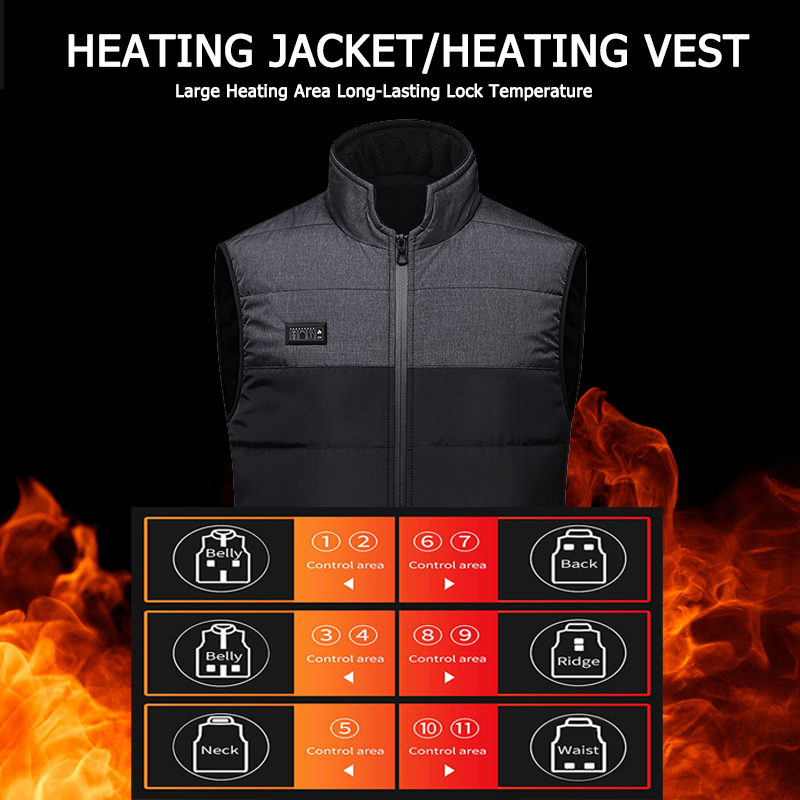
A heated vest runs on a simple energy conversion: electrical energy → thermal energy → body heat. The battery pack stores DC voltage (7.4V or 12V). This voltage flows through conductive paths to carbon fiber heating elements in the vest’s fabric. These elements resist the electrical current. This creates heat through the Joule heating effect—the same principle your electric stove uses.
The core steps look like this:
Battery discharge → Voltage conversion (if needed) → Current flows through heating zones → Heat radiation and conduction → Warmth reaches your body
The Energy Flow Chain
The battery pack delivers direct current at a stable voltage. Most heated vests use lithium-ion batteries rated between 5000mAh and 10,000mAh. Press the temperature control button. A microcontroller then regulates the power output—three settings: low (35-40°C), medium (45-50°C), and high (55-60°C).
The heating zones get different current loads based on your setting. Low power draws 5-8 watts total. High settings pull 15-25 watts. This variable power draw impacts runtime. A 10,000mAh battery at 7.4V delivers 74 watt-hours. At 20 watts consumption, you get 3.5 hours of continuous heating on high.
Carbon fiber heating elements convert electrical energy at 85-95% efficiency. Minimal energy waste means more warmth per amp-hour. The thermal insulation layer traps this heat against your torso. This creates a warm microclimate that keeps you comfortable even in sub-zero conditions.
Main Components
A heated vest has five key parts that work together. Each part does a specific job in the heating system. Know these parts to check quality and fix problems.
Rechargeable Battery Pack
The power source sits in a secure pocket at the lower back or inside chest. Lithium-ion batteries run this market. They pack high energy, weigh less, and deliver steady power. Most quality vests come with 7.4V batteries (two 3.7V cells in series). Capacity ranges from 5000mAh to 10,000mAh.
Check the battery’s protection circuit board (PCB). This small board stops overcharge, over-discharge, and short circuits. Premium batteries have multiple safety layers. You get temperature sensors, current limiters, and automatic shut-off. Look for UL, CE, or FCC marks on the battery casing. These show third-party safety testing.
Battery weight affects comfort. A 10,000mAh pack weighs 200-300 grams. Cheap models skimp on safety circuits. They use lower-grade cells to cut weight. Bad trade-off.
Carbon Fiber Heating Elements
These flexible panels are the heart of your vest’s warming system. Carbon fiber beats old metal wire heating. Here’s why: even heat spread, faster warm-up (30-60 seconds to full heat), and better flex that moves with you.
The elements sit between fabric layers in key heating zones. You get upper back, lower back, and front chest panels. Each zone has parallel carbon fiber strands wired for uniform resistance. Current flows. Every strand heats at once. No hot spots. No cold patches.
Quality heating elements use encapsulated carbon fiber sealed in waterproof film. This build survives machine washing. It blocks electrical exposure. Budget vests skip this safety step. Their elements break down after a few washes or quit working in wet conditions.
Temperature Control Module
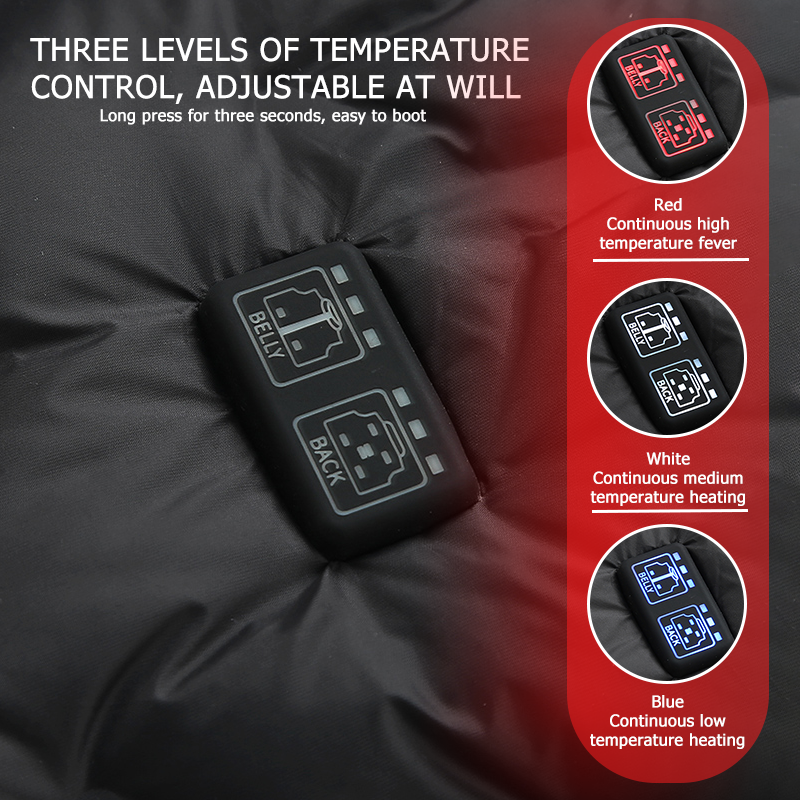
A small controller box regulates power flow to the heating zones. It’s about the size of a USB thumb drive. Press the button. LED lights (three colors: blue/white/red) show your current setting. Each press cycles through low → medium → high → off.
A microcontroller chip sits inside the controller. It runs voltage control programs. The chip reads battery voltage. It adjusts current output. It watches safety limits. Advanced models add smartphone connectivity via Bluetooth. You can adjust temperature from an app. You can check battery life left.
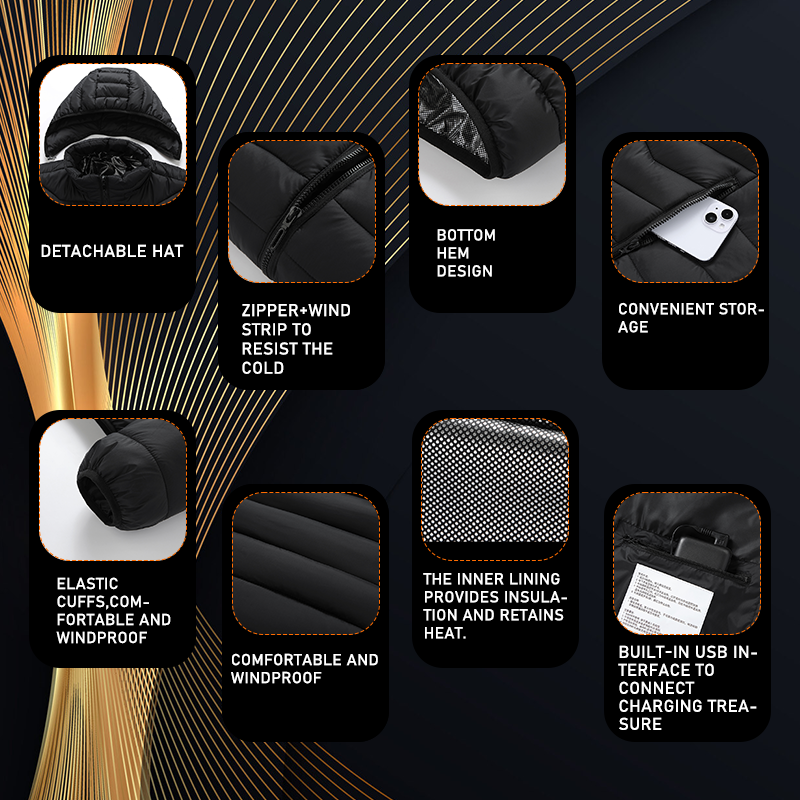
Controller placement differs by design. Some makers put it in the battery pocket. Others mount it on the vest’s outside for easy reach. External placement is better. You can change settings without unzipping layers.
Thermal Insulation Layer
Heat means nothing without good retention. The insulation layer traps warmth against your body. It blocks cold air from getting in. Most heated vests use polyester fill (80-120g/m²) or thin down insulation between the outer shell and inner lining.
This layer teams up with the heating elements. Together they keep comfortable temperatures at lower power use. Better insulation means longer battery life. A well-insulated vest holds 45°C body temperature using just 8-10 watts. Poor insulation pushes the system to run at 15-20 watts for the same warmth.
Heat retention fabric on the inner lining bounces heat back to your body. Look for materials with aluminum or ceramic coatings. These reflective barriers boost heating by 15-20%. They don’t add bulk.
Wiring and Connection System
Thin, flexible wires link the battery to the controller. Then they branch to each heating zone. Premium vests use silicone-insulated copper wire (20-22 AWG). This gives durability and cold-weather flex. Standard PVC insulation gets stiff below freezing. That’s a real problem for winter gear.
Connection points use waterproof connectors with snap-lock or magnetic coupling. These joints handle repeated plug/unplug cycles for battery charging. They stay tight. Weak connections build resistance. This causes voltage drop and weaker heating.
Some newer designs use USB-C powered vest setup. These vests take any USB-C power bank instead of a special battery. This offers flexibility. But it caps maximum power output to USB-PD specs (20V/3A = 60W max).
Heating Technologies
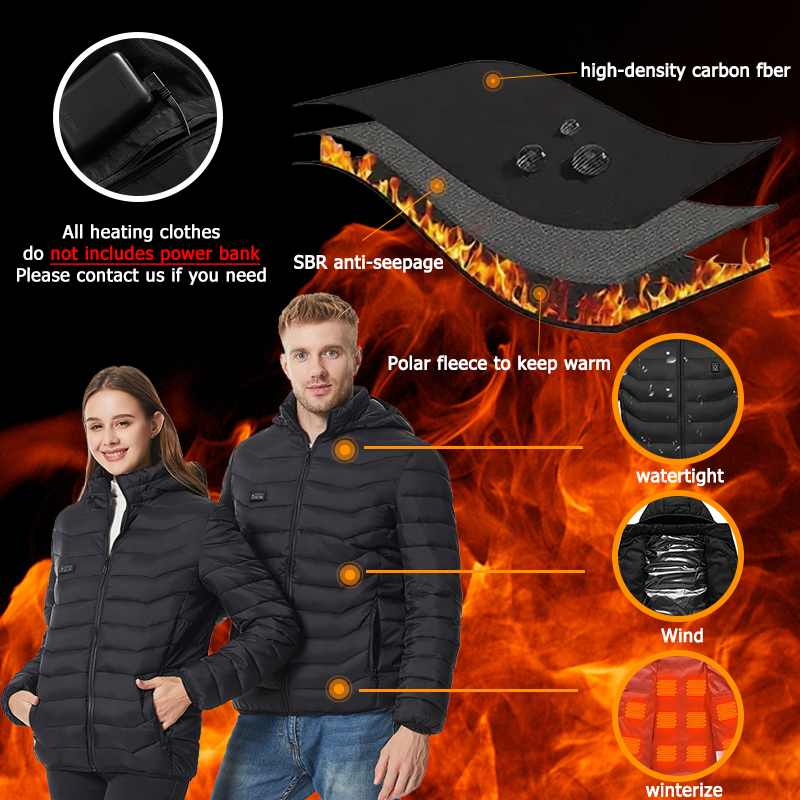
Heated vests use three main heating methods. Each one turns battery power into warmth differently. Your pick changes how fast you warm up, how long your battery lasts, and how comfortable you feel.
Carbon Fiber Heating Elements
Carbon fiber runs the heated clothing market. 83% of top brands use it. Think of it like air-source heat pumps—simpler tech wins. Carbon fiber panels warm up fast (30-60 seconds to full heat). They bend without cracking. Heat spreads across large areas smoothly.
How does it work? Electricity flows through carbon strands. The strands resist that flow. This creates heat. Multiple strands run parallel to each other. One strand breaks? The rest keep going. You won’t get cold spots.
Energy efficiency reaches 90-95%. Nearly every watt turns into heat. Metal wire systems only hit 75-80%. Better power use means your battery lasts longer. A 10,000mAh battery gives you 4-5 hours on medium with carbon fiber. Metal wire? Just 3-3.5 hours at the same level.
Carbon fiber survives the washing machine. It handles being squished. It won’t rust. Top-quality vests wrap these parts in waterproof film with IP65 protection. Snow and light rain? No problem.
Metal Wire Heating Coils
You’ll still find metal wire tech in cheap vests under $50. Thin nickel-chromium wires snake through fabric paths. Electricity heats the wire. The wire heats your body.
Making these costs 40-50% less. Budget brands love that. But performance suffers. Wires bunch up and create hot spots. The heat feels patchy. Bending breaks them down. Wash and wear them enough, and the wires fail within 50-100 cycles.
These vests drain batteries faster. Metal wire pulls 25-30 watts on high—carbon fiber only needs 18-20 watts for the same warmth. You lose 20-30% of your runtime with the same battery.
Infrared Heating Technology
Infrared panels sit at the top. Carbon-soaked fabric or graphene layers send out far-infrared rays. These rays pass through cloth and skin. They warm your body directly, not the air.
This copies industrial heating used in metal plants. Direct heat transfer works better than warming air. You feel it quicker. The warmth stays longer after you turn it off. Your body holds onto that infrared energy.
Industry data shows infrared systems growing 7.1% CAGR. Heated clothing follows the same path—just smaller. Premium infrared vests cost $180-$300. Basic carbon fiber runs $80-$150.
What’s the catch? Infrared needs thicker panels (3-5mm vs 1-2mm for carbon fiber). You get a bit more bulk. But heat stays 15-20% longer. For real cold-weather use, those extra millimeters pay off.
Temperature Control
Three buttons. Three heat levels. That simple interface uses the same PID logic (proportional-integral-derivative) that runs industrial HVAC systems worth USD 25.81 billion globally in 2025. Your heated vest just shrunk it down.
The temperature control module manages power flow in real-time loops. Press the button. A microcontroller chip reads your choice: low (35-40°C), medium (45-50°C), or high (55-60°C). It adjusts PWM (pulse-width modulation) duty cycles to the heating zones. High setting? The chip sends full-power pulses at 95-100% duty. Low? It drops to 30-40% duty cycles. Same voltage, just shorter on-time per pulse.
Smart Temperature Regulation Systems
Premium models add thermistor sensors near heating elements. These small resistors shift resistance as temperature changes. The controller checks this feedback every 2-3 seconds. Temperature goes above your target? The system cuts power. Too cold? It boosts up. This closed-loop control works like AI-based model predictive control (MPC) in building systems. The same tech saves 15-20% energy in commercial HVAC.
Budget vests skip sensors. They use open-loop control. You set it, and it pushes fixed power. No adjustment. Battery voltage drops during use. Heat output falls 10-15% over the first hour. You won’t notice the slow cooling until discomfort sets in.
Advanced vests connect to smartphone apps via Bluetooth. The global HVAC controls market reaches USD 39.07 billion by 2030 (8.6% CAGR). Heated clothing rides this digital trend. App control gives you fine-tuned temperatures in 1-degree steps. You track battery percentage. Some models offer zone-specific heating. Warm your back at high, chest at medium. Industrial temperature controllers using single-loop control held 48.7% market share in 2024. Your vest uses the same idea, just pocket-sized.
Safety circuits monitor over-temperature conditions. Heating elements reach 65°C? The controller shuts down that zone right away. This protection works independent of your button presses. The main chip fails? A backup thermal fuse cuts power at 70-75°C. No burns. No fire risk.
Battery life ties to your control choices. High setting drains 18-25 watts. Medium pulls 10-15 watts. Low uses 5-8 watts. A 10,000mAh/7.4V battery (74Wh) gives you 3 hours on high, 5 hours on medium, 8-10 hours on low. Temperature control goes beyond comfort. It’s about runtime management. Pick the right setting for your conditions.
Typical Temperatures & Heat Distribution
Heated vests work within a safe temperature range. The three standard settings hit specific temperatures: low delivers 35-40°C (95-104°F), medium reaches 45-50°C (113-122°F), and high peaks at 55-60°C (131-140°F). These temps stay below the 70°C (158°F) threshold where discomfort starts. They’re far from the 155°C (311°F) max found in industrial heaters.
Heat Zone Layout & Coverage
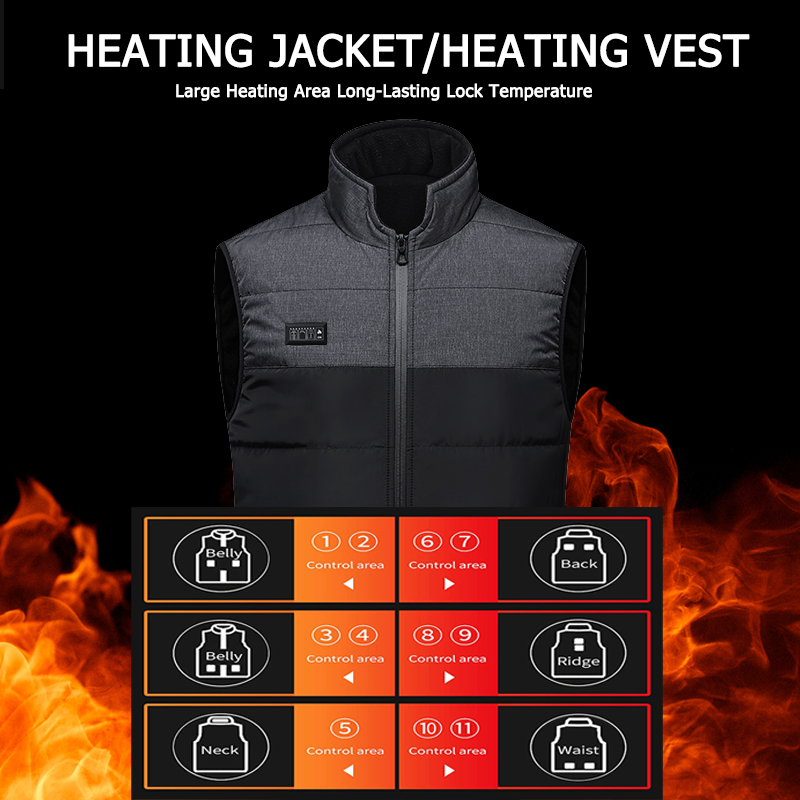
Quality vests use three main zones: upper back, lower back, and chest. The upper back panel sits between your shoulder blades. This area has the most heat sensors. It gets 40-45% of total power. Your body feels warmth fastest here.
The lower back zone covers your lumbar area. It takes 30-35% of heating power. People who stand all day benefit most. So do those with back pain. The chest panel runs 20-25% power. This warms your core without raising your heart rate.
Premium models add side panels along your ribs. They also include collar zones near your neck. These extra areas use 5-8 watts each on high settings. They fill heat gaps. They block cold air where your vest meets other clothes.
Temperature Consistency Across Zones
Carbon fiber elements keep ±2-3°C variance across a single zone. You won’t feel hot stripes or cold spots. Budget vests with metal wire show ±8-10°C swings in the same panel. Hot spots spike near wire bundles. Cold patches appear where wires spread out.
Proper vest fit improves heat distribution. Loose fabric creates air gaps. Your body heat escapes. The heating elements work harder. Battery drain increases 15-20% with poor fit versus a snug, correct-sized vest.
Battery and Runtime
Your heated vest’s battery controls how long you stay warm. Runtime depends on three things: battery capacity (Wh), heating power draw (W), and temperature setting. The math is easy: Runtime (hours) = Battery Capacity (Wh) ÷ Power Draw (W).
Most heated vests use 7.4V lithium-ion batteries. Capacity ranges from 5000mAh to 10,000mAh. Here’s the conversion: a 10,000mAh battery at 7.4V gives 74 Wh (10,000 × 7.4 ÷ 1000). Premium models use 12V batteries up to 12,000mAh. That’s 144 Wh of total energy.
Real-World Runtime Breakdown
High setting (55-60°C) uses 18-25 watts. That 74 Wh battery runs 3-4 hours nonstop. Switch to medium (45-50°C) at 10-15 watts. You get 5-7 hours. Low setting (35-40°C) draws 5-8 watts. Runtime extends to 9-12 hours.
Compare this to other gear. Your smartphone’s 20 Wh battery runs 6-8 hours at 2-3 watts. A laptop’s 60 Wh pack lasts 4-5 hours on light work (10-15 watts). Heated vests use laptop-level power. The difference? Smaller size. Lighter weight.
Cold weather hurts performance. Lithium-ion output drops 15-20% below freezing. A battery rated for 5 hours at 20°C delivers 4-4.5 hours at -10°C. Keep your backup battery in an inside pocket. Body heat keeps it working right.
Battery Degradation Timeline
After 300-500 full charge cycles, capacity drops to 80-85%. That 74 Wh battery becomes 59-63 Wh. Your high-setting runtime drops from 4 hours to 3.2-3.4 hours. Top batteries use Samsung, LG, or Panasonic cells. These last longer—up to 800-1000 cycles before hitting 80% capacity.
Your charging habits make a difference. Keep charge between 20-80% instead of 0-100%. This triples cycle life—sometimes more. Don’t store batteries dead. Leave them at 40-60% charge. Store in cool, dry places (15-25°C). Heat above 40°C cuts battery life in half.
USB-C vests give you options. Any 20W+ USB-PD power bank works fine. A 20,000mAh phone charger (74 Wh) equals vest batteries. You probably have backup power at home right now.
Safety & Protection
Heated vests pack multiple safety layers. These go beyond typical consumer electronics standards. The global physical security equipment market hits USD 70 billion by 2026. Strict safety rules drive this growth. Your heated vest uses the same safety setup that guards 7.87 million workers in factories and job sites around the world.
Built-In Protection Circuits
Quality battery packs include a protection circuit board (PCB). This board has four key safeguards. Overcharge protection stops charging at 4.2V per cell. Go above this, and lithium-ion batteries risk thermal runaway. Over-discharge cutoff kicks in at 2.5V per cell. This prevents lasting damage and fire risks.
Short-circuit protection spots odd current spikes above 10-15 amps. The circuit breaks in microseconds. That’s faster than you can blink. Temperature monitoring uses NTC thermistors. These track battery heat. The system shuts down if inside temperature tops 60-65°C. This layered setup matches industrial safety products standards. That market grows at 7.1% CAGR through 2036.
Premium vests include a backup thermal fuse. This is a physical failsafe separate from electronic circuits. The fuse melts and breaks the circuit if heating elements hit 70-75°C. You can’t reset it. Replace the fuse or get a new vest. This hard stop prevents 155°C temperatures where fabric can catch fire.
Regulatory Compliance & Certifications
Check for UL, CE, FCC, or RoHS marks on both battery and vest. UL certification runs tests for electrical safety, fire risk, and part quality through 1,000+ cycle tests. CE marking shows it meets EU safety rules. These cover electromagnetic compatibility and low voltage equipment.
OSHA and NIOSH create workplace safety standards. These protect workers. 5,333+ workers died in U.S. work incidents in 2019. Quality heated vests meet or beat these industrial requirements. The global workplace safety market grows from USD 26.21 billion (2026) to USD 93.25 billion (2034) at 17.19% CAGR. Consumer heated clothing now uses industrial-grade safety. This taps into the growing safety-focused market.
Waterproofing & Electrical Isolation
Heating elements need IP65-rated encapsulation. This guards against water jets from any angle. Carbon fiber panels sit sealed in TPU (thermoplastic polyurethane) film. This blocks moisture but lets heat through. Connector points use rubber gaskets and waterproof caps after you disconnect them.
Never submerge your vest. IP65 handles rain and snow. It won’t survive swimming. Water getting in creates electrical leakage paths. This drains your battery and risks short circuits. Remove the battery before washing. Use gentle cycle with cold water. Air dry fully for 24-48 hours before you plug power back in.
Safe Operating Guidelines
The personal protective equipment (PPE) market reaches USD 91.4 billion by 2025. Good safety habits save lives. Use the same care with your heated vest. Never wear your vest while charging the battery. Charging makes heat. Running the heating elements at the same time creates thermal stress. This wears down your battery faster and raises fire risk.
Check heating zones each month. Feel for odd hot spots. Temperature gaps above 5°C mean damaged elements. Look at wiring for fraying, kinks, or exposed copper. Replace right away if you spot damage. Bad wiring causes arc faults that can light fabric on fire.
Don’t put your heated vest under heavy, non-breathable outer shells. Heat gets trapped. Your body can’t control temperature. You risk hyperthermia even in cold weather. Wear breathable outer layers. Watch how you feel. Turn down or off if you start sweating.
Store batteries at 40-60% charge in cool, dry spots (15-25°C). Very cold temps below -20°C can crack battery cases. Heat above 40°C speeds up wear and leakage risk. ILO reports 612 worker deaths each day from job accidents. Many could be stopped through proper equipment care. Your heated vest needs the same respect as industrial safety gear.
Typical Use & Operation
Your heated vest needs three steps: charge the battery, connect it to the vest, and press the power button. First-time setup takes under 2 minutes. Remove the battery pack from its pocket—you’ll find it at the lower back or inside chest area. Plug the charging cable into any standard USB port or wall adapter (5V/2A minimum). A 10,000mAh battery needs 3-4 hours to charge. The LED indicator turns green when done.
Slide the charged battery back into its pocket. Connect the power cable to the vest’s internal port. You’ll hear or feel a click when it’s seated right. Press the temperature control button once. The LED lights up blue for low, white for medium, or red for high. Heat starts flowing within 30-60 seconds. Your back and chest zones warm up first.
Real-World Usage Scenarios
Morning commutes work best on low setting (35-40°C). This stretches battery life to 8-10 hours. You stay comfortable in mild cold (0-10°C). Switch to medium (45-50°C) for outdoor work sessions in freezing temps (-5 to 0°C). Construction workers, delivery drivers, and event staff use medium for 5-7 hour shifts.
High setting (55-60°C) tackles extreme cold. Ice fishing, skiing, and snowmobiling in sub-zero weather (-10°C and below) need maximum heat. Runtime drops to 3-4 hours. Pack a backup battery for full-day activities. Swap batteries in 15 seconds—no tools needed.
Turn off your vest during high-activity periods. Your body creates heat through hard work. Running both wastes battery. Overheating becomes an issue too. Turn heating back on during rest breaks or lighter tasks.
Key Comparison Points (for buying)
Shop for a heated vest with a clear plan. Most buyers compare 3-5 models before deciding. Focus on four main factors: heating performance, battery system, build quality, and price value. These help you cut out bad options fast.
Heating Performance & Temperature Range
Check the heating specs first. Does the vest reach the temperature you need? Budget models max out at 45-50°C on high. Premium vests hit 55-60°C. Look at the number of heating zones. Entry-level vests offer 2 zones (back). Mid-range adds chest coverage for 3 zones. Top models include 5-7 zones with side panels and collar heating.
Compare warm-up speed. Carbon fiber heating elements reach full temperature in 30-60 seconds. Metal wire systems need 2-3 minutes. Quick outdoor breaks? That difference matters. Premium models offer zone-specific control. You can run your back at high while keeping chest at medium. This saves battery and boosts comfort.
Battery Capacity & Runtime Economics
Calculate your required runtime first. Then match battery capacity. A 5,000mAh/7.4V battery (37Wh) runs 2 hours on high, 3.5 hours on medium. Double that to 10,000mAh (74Wh) for 4 hours high, 7 hours medium. Don’t guess—do the math: Runtime = Battery Wh ÷ Power Draw (W).
Check if the vest uses proprietary batteries or standard USB-C power banks. Proprietary packs cost $40-$80 for replacements. USB-C compatibility? You can use existing power banks. Huge cost advantage over 3-5 years. Think about battery replacement cycles. Quality cells last 500-800 charge cycles before capacity drops to 80%. Cheap batteries fail at 200-300 cycles. A $30 battery that dies in one season costs more than a $70 battery lasting three years.
Build Quality & Durability Standards
Check the heating element seal. Premium vests seal carbon fiber in IP65-rated TPU film. This survives machine washing and light rain. Budget models use basic fabric stitching. Moisture kills them in 6-12 months. Look at connector quality. Find waterproof snap-lock or magnetic connectors with rubber gaskets. Cheap barrel connectors corrode and fail.
Read the warranty terms. Industry standard offers 1 year on electronics, 90 days on battery. Top brands extend this to 2 years full coverage. Warranty length shows manufacturer confidence. A 90-day warranty? Quality problems. Check the safety certifications: UL, CE, FCC, or RoHS marks prove third-party testing. No marks? Skip that vest. Safety risk isn’t worth saving $20.
Total Cost Analysis
Compare upfront price plus 3-year ownership cost. A $79 vest with a $45 replacement battery needed each year costs $169 total over three years. A $149 vest with batteries lasting the full period costs $149. Cheaper long-term despite higher entry price. Check replacement part availability. Can you buy spare heating panels? New battery packs? Or do you throw away the entire vest after one component fails?
Score each finalist 1-5 on these four criteria. Weight them: heating performance 30%, battery system 30%, build quality 25%, price value 15%. Calculate scores times weights. The highest total wins. This removes emotion and marketing hype from your decision. You get the vest that fits your needs and budget—not the one with the flashiest ad.
Conclusion
You now understand how heated vests work. Carbon fiber heating elements turn electricity into warmth. Temperature control settings manage your comfort. You’re ready to make a smart choice.
Modern heated vests combine advanced heating zones with efficient rechargeable battery packs. Plus, they have smart safety features. This makes them reliable for cold weather.
Work outdoors? Enjoy winter sports? Commute in freezing temps? The technology works and it’s practical.
The key is picking a vest with quality parts. Look for consistent heat distribution systems. Check the battery performance. Make sure it has multiple temperature settings that fit your needs.
Ready to feel the warmth yourself? Check out our premium heated vests at CoolHeaTech.com. We combine cutting-edge infrared heating technology with durability and comfort. Your winter warmth solution is one click away. Understanding how it works helps you stay warm all season long.