
You’ve bought a heated vest for those cold winter days. Now you’re in your bedroom trying to figure out where it goes. Does it go under your flannel? Over your thermal? Somewhere in between? And will “high” heat turn you into a walking toaster? You’re not alone!
Staying cozy without overheating is simple. It comes down to a few layering tricks and settings tweaks. Most people learn these the hard way.
Maybe you’re doing morning chores in freezing weather. Or hitting the slopes. Or surviving your drafty office without looking bulky. Getting your heated vest layering right changes everything.
Here’s what you need to know: the best base layer setup, where to place your battery, and how to stay comfortable for hours. You shouldn’t have to pick between warmth and being able to move your arms.
Step-by-Step Guide: How to Wear a Heated Vest
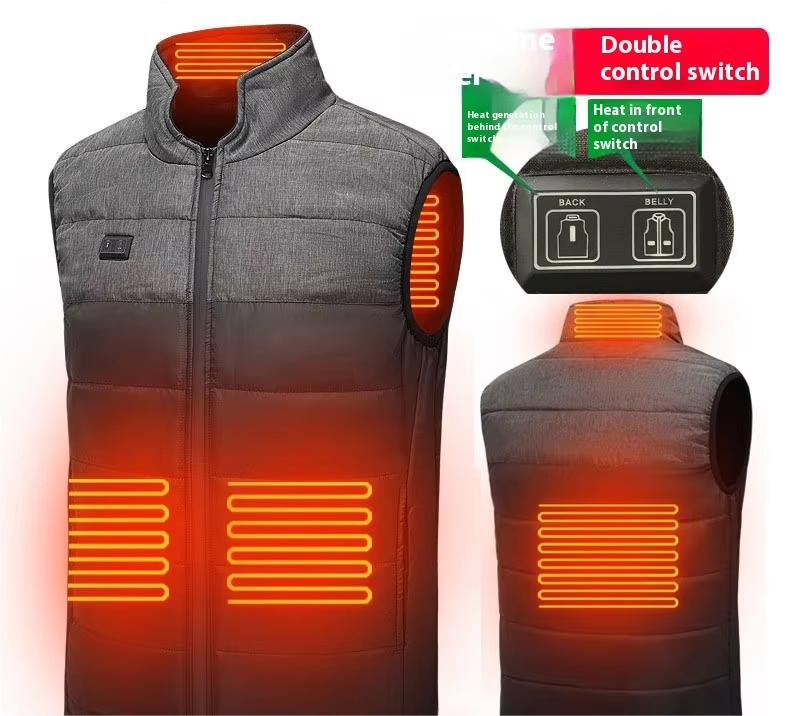
Getting your heated vest on right isn’t rocket science, but there’s a method to it. Follow these steps in order. You’ll be toasty warm without any fumbling around.
Step 1: Charge That Battery First
Make sure your battery is charged before you do anything else. This matters most if it’s your first time using the vest. Look for the LED indicators on your battery. All the lights should be steady, not blinking. Red or blue lights show you the charge level. Has your vest been sitting in the closet for a while? Give that battery a refresh charge to keep it healthy.
Step 2: Put On Your Base Layer
Here’s a rule you can’t skip: never wear your heated vest on bare skin. I can’t stress this enough. Put on a base layer underneath first. A thermal shirt works. A long-sleeve tee works. You need something between you and those heating elements. This isn’t just about comfort (though you’ll regret skipping it). It’s about safety. It prevents skin sensitivity issues and weird heat discomfort.
Step 3: Slip Into the Vest
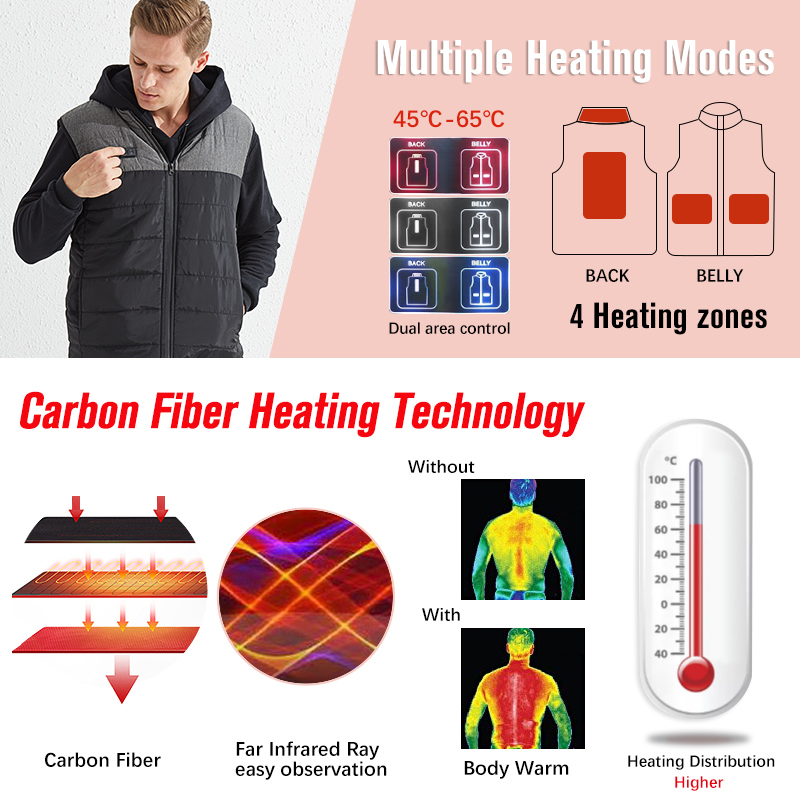
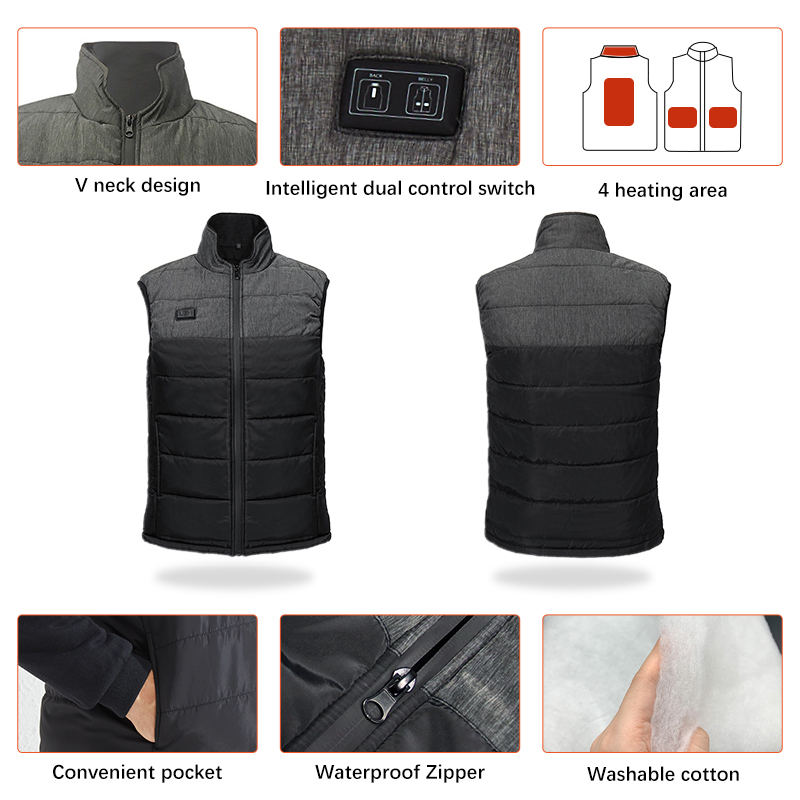
Now comes the fun part. Put your heated vest on over that base layer. Pay attention to where those heating zones line up with your body as you pull it on. The chest panels should sit centered on your chest. The back panel needs to align with your spine. Does your vest have collar heating? Make sure it sits against your neck without twisting or bunching up. Most vests have 4-6 heating zones. They cover your chest, back, and collar area. Proper positioning makes all the difference.
Step 4: Adjust the Fit
Your heated vest should fit snug but not tight. Think “slim fit” rather than compression wear. You want it close enough to your body so the heat transfers well. But you shouldn’t feel squeezed or restricted. These vests have stretch panels built in. So you can move around with ease. Your arms stay unrestricted—perfect for shoveling snow, chopping wood, or whatever winter task you’re tackling.
Step 5: Connect the Battery
Time to power up. Grab your battery and slide it into the internal pocket or pouch. Every vest has one built in somewhere. Then connect the USB plug to the vest’s wiring connector. Most heated vests run on 5V, 7.4V, or other voltage systems. Battery capacities range from 5,000 mAh to 10,000 mAh. Make sure that connection is secure. You don’t want it coming loose halfway through your morning commute.
Step 6: Add Your Outer Layer (If Needed)
Here’s where you make the call based on how cold it is outside. Is it just a bit chilly? You might be fine with the vest over your base layer and nothing else. The vest’s wind and water-resistant exterior can handle light weather on its own. But extreme cold or harsh conditions? Layer your regular jacket over the vest. This traps the heat even better. You get maximum warmth without the bulk of traditional winter gear.
Step 7: Power It On
Press and hold that power button for about three seconds. The vest will activate. You might notice it kicks into a boost mode right away—that’s normal. It does a quick preheat to get you warm fast. Then it settles into medium setting on its own. Pretty smart, right?
Step 8: Adjust Your Heat Settings
Your vest has three heat levels: low, medium, and high. Press the button again and again to cycle through them. Find your sweet spot. Start lower than you think you need, even if it’s cold outside. Here’s why: battery life changes a lot based on your setting. Take a 7.2V/5000 mAh battery as an example. High heat gives you about 2.5 hours. Medium gets you 5 hours. Low can stretch to 9 hours. That’s a huge difference for an all-day outdoor plan.
Pro tip: Monitor how your body feels as you wear it. Start feeling any hot spots or discomfort? Bump the setting down or turn it off for a bit. Your comfort is the goal here, not turning yourself into a baked potato.
Smart Layering for Different Situations
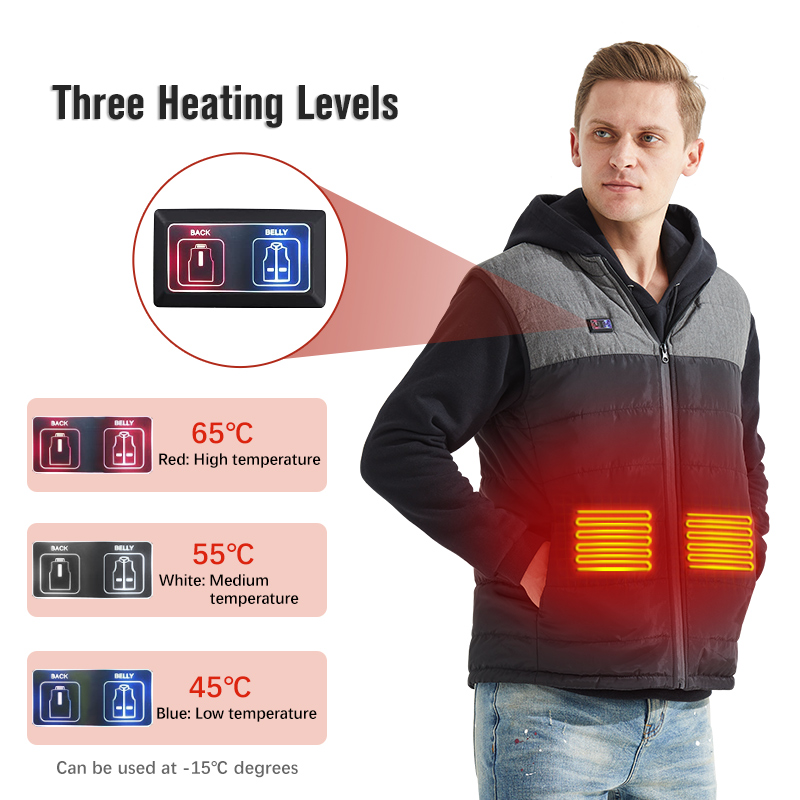
Your heated vest works differently depending on what you’re doing. How you layer it changes based on your activity and location. Think of it like cooking—you don’t use the same recipe for breakfast and dinner, right? Same deal here.
Build your layers in stages, like stacking pancakes. Each layer has a job. Get the order wrong and you’ll freeze or sweat through your shirt. Here are the scenarios that matter most.
Daily Commute and Office Work
Start with a moisture-wicking base layer. Pick something lightweight that pulls sweat away from your skin. Your heated vest goes on next, over that base layer. You’re moving between heated car, cold parking lot, and office. You need flexibility.
Here’s what works: base layer + heated vest + light outer jacket or blazer. Keep your vest on low to medium during the commute. At your desk? Turn it off or drop to the lowest setting. Your body heat plus the office heating keeps you comfortable. The vest’s slim profile means you won’t look bulky under a cardigan or sport coat.
Battery strategy for office days: A 5,000 mAh battery on low gives you about 8-9 hours. That’s your whole workday. Charge it overnight and you’re set for tomorrow.
Outdoor Winter Activities (Hiking, Hunting, Fishing)
This is where heated vest layering gets interesting. You’re creating body heat from moving around. But you’re also exposed to wind, snow, and dropping temperatures.
Layer it this way: thermal base layer + heated vest + insulated jacket. Start your hike with the vest turned off. Your body warms up from the movement. About 15-20 minutes in, check how you feel. Cold settling into your core? Turn the vest to low. Standing still watching for deer or waiting for fish to bite? Bump it to medium or high.
The vest becomes your adjustable middle layer. Too warm climbing uphill? Turn it off without removing layers. Temperature dropping as the sun sets? Crank it up without adding bulk.
Real-world example: Winter hikers use this “staggered activation” approach. They save their 10,000 mAh battery for the coldest parts of their hike. Morning starts and late afternoon descents get the heat. Run the vest on high for just 2-3 hours during these times. Switch to body heat alone during active periods. That battery lasts an entire weekend camping trip.
High-Intensity Winter Sports (Skiing, Snowboarding, Ice Climbing)
These activities are tricky. You’re working hard and creating tons of heat. But you’re also exposed to brutal wind chill and freezing chairlift rides.
Best heated vest tips for this scenario: Wear it snug over a thin base layer, under your ski jacket. Start with the vest off. Use it for chairlift rides and waiting periods. Turn it on medium for the ride up. Switch it off for your run down. This “interval heating” approach stops you from overheating during activity. It keeps your core warm during rest.
Your battery placement matters more here. Make sure it’s secured deep in that internal pocket. You don’t want it bouncing around or shifting during carving turns or reaching for holds.
Temperature cycling strategy: Think of your vest’s heat settings like gears on a bike. Low = cruising. Medium = extra boost for tough moments. High = emergency warmth. Most snowboarders use high setting less than 15% of the day. Just for extreme cold snaps or long lift rides.
Extreme Cold Work Environments (Construction, Delivery, Snow Removal)
Working outside in sub-zero temperatures all day needs a different approach. You need sustained warmth, not occasional bursts.
Build your layers thick: heavyweight thermal base + heated vest + insulated work jacket. Run your vest on medium as your baseline. This gives you 4-6 hours of consistent heat with a standard 7.4V battery. Bring a backup battery in your truck or job site. Swap it out at lunch. You’ve got warmth for your full shift.
For workers doing heavy physical labor, here’s a smarter setup: Use low setting the whole time instead of medium on and off. Your body heat from shoveling or lifting combines with the vest’s low heat output. Together they create steady warmth that lasts 8-9 hours on a single charge. You avoid the boom-bust cycle of getting too hot, turning it off, then freezing again.
Cost-benefit insight: Construction workers report a heated vest base layer system saves them from needing three or four heavy sweatshirts. One charged battery costs about $0.50 in electricity. It replaces bulky clothing that restricts movement and slows you down.
No matter which scenario fits your life, the principle stays the same: layer smart, adjust as you go, and let your heated vest work as your flexible middle layer—not your sole source of warmth.
Should You Wear It as a Mid-Layer or Base Layer?
Your heated vest belongs in the middle, not against your skin. Here’s why this matters for all-day comfort.
Heated vests work as mid-layers, not base layers. They need something underneath to function right. That thin thermal shirt or long-sleeve tee creates the perfect foundation. The heating elements warm the air trapped between your base layer and the vest. That warmed air then spreads against your body. Skip the base layer? You’ll get uneven heating, hot spots, and regret.
Why Mid-Layer Placement Works Best
Think of your layering system like a team. Everyone has a specific job. Your heated vest base layer (the shirt underneath) handles moisture. It pulls sweat away from your skin. Your heated vest provides adjustable warmth as the mid-layer. Your outer jacket—if you need one—blocks wind and keeps all that heat from escaping.
Here’s what happens with your heated vest over shirt set up right: the base layer creates a thin buffer zone. This prevents direct contact between heating elements and skin. You avoid that clammy, uncomfortable feeling. Plus, if you’re moving around and making your own body heat, that base layer wicks moisture away before it freezes against you. Anyone who’s spent time in serious cold knows this rule: avoid sweating to prevent freezing. It’s an Arctic survival principle that applies to your morning dog walk too.
The Temperature Sweet Spot
A well-fitted heated vest over a moisture-wicking base creates a microclimate you control. Your base layer (85-150 g/m² weight) plus your vest’s heating zones give you flexibility. The vest adds 7°F to 15°F of adjustable warmth depending on your heat setting.
Cold weather heated vest layering works because you stack warmth smart. Light base + heated vest on medium = comfortable down to about 20°F for most people. Add an insulated jacket over that? You’re good into sub-zero territory. The beauty is you can turn the vest down or off without removing any layers. Try doing that with a regular fleece mid-layer.
Never wear your heated vest as your sole layer. It’s designed to work with your other clothing, not replace it.
Temperature Settings and Battery Life Management
Your battery hates temperature extremes just as much as you do. That little power pack tucked in your vest pocket works best when you know its limits. Let’s talk about keeping it happy so it keeps you warm.
The Temperature Sweet Spot for Your Battery
Lithium-ion batteries power your heated vest. They perform best between 68°F and 113°F (20–45°C). This isn’t just a suggestion. It’s chemistry. Push outside that range and things get messy.
Here’s what happens with high temperatures. Run your battery in 113°F conditions instead of the ideal 77°F. Performance loss doubles. After 200 charging cycles, you’ll see 6.7% degradation instead of 3.3%. That adds up fast. Store your battery in a hot car all summer? You’re cutting its lifespan in half. Every 15°F you stray from the optimal range slashes battery life expectancy by 50%. Ouch.
Cold weather creates different problems. Drop below 50°F and your battery runtime falls off a cliff. Temperature swings of just 5–8°F cause uneven aging across battery cells. Notice your vest doesn’t heat the same way after a season of use? Temperature stress is the culprit.
Smart Heat Setting Choices That Extend Battery Life
Your heated vest comfort shouldn’t cost you a fortune in replacement batteries. Here’s how to be smart about those three heat settings.
Low setting is your friend for all-day wear. Running on low gives you 8-9 hours from a 5,000 mAh battery. Your battery stays cooler too, under that critical 113°F mark. Medium setting cuts your time to 5 hours but makes more internal heat. High setting? You get 2.5 hours max, and your battery is working overtime.
Think about it like driving your car. Floor the gas pedal everywhere and you get there faster. But you destroy your gas mileage and engine life. Same thing applies to your heated vest temperature settings.
Use the “pulse method” for best results. Turn your vest on high for 10-15 minutes to warm up fast. Drop to medium once you’re comfortable. Switch to low to maintain warmth. This keeps your battery in its happy temperature range. Plus, you get the heat you need right when you need it.
Battery Placement That Prevents Overheating
Where you put your battery matters more than you’d think. Most vests have internal pockets designed for this. They’re there for safety and performance.
Never let your battery sit in direct contact with heating elements. The vest’s internal pocket keeps it separated from heating zones. This stops a dangerous loop where the battery heats itself while the vest warms it too. Batteries exposed to temperatures above 113°F see rapid cell damage. Push past 140°F and you’re entering safety risk territory.
Check your battery during wear. Does the pocket feel too hot to touch? Turn your vest down a setting. Your battery should feel warm but never hot. This simple check protects your investment and keeps you safe.
Storage Strategies for Off-Season Battery Health
What you do with your battery in May decides how well it performs next November. Storing batteries at full charge in high temperatures destroys capacity. Here’s the proof: after just three months of storage in warm conditions at full charge, battery capacity drops from 98% to 60%. That’s brutal.
Store your battery at 40-60% charge in a cool, dry place. Room temperature works fine. A basement or interior closet beats a garage that swings from freezing to hot. Keep it away from windows and direct sunlight. Ventilation helps too—don’t seal it in an airtight container.
Before your first cold weather use each season, charge your battery to 100% and run one complete discharge cycle. This resets the battery management system. You get accurate runtime estimates.
Real-World Battery Life Monitoring
Facilities that monitor battery health see 35% longer average battery life. You don’t need fancy equipment. Just pay attention to these warning signs:
-
Your vest takes longer to heat up than it used to
-
Runtime drops on the same setting
-
The battery feels too hot during normal use
-
Charging takes much longer or shorter than before
One more critical point about battery placement and temperature: cold batteries charge badly and can be dangerous. Never charge a battery that’s come in from freezing temperatures. Let it warm to room temperature first. Charging below 32°F can cause permanent damage to lithium-ion cells.
Your battery is your heated vest’s engine. Treat it right by managing temperatures, choosing smart heat settings, and storing it the right way. Do this and you’ll get years of reliable warmth instead of replacing batteries every season.
5 Common Mistakes That Reduce Heating Efficiency
Most folks don’t realize they’re sabotaging their own warmth. Your heated vest works like a dream when you use it right. Make a few simple mistakes and you’ll burn through batteries. You’ll feel cold spots. You’ll wonder why you spent good money on this thing.
Here’s the truth: your heated vest isn’t broken—you’re just using it wrong. I see these same mistakes over and over again. Let’s fix them so you can stay warm out there.
Mistake #1: Wearing Your Vest Against Bare Skin
This is the big one. I can’t tell you how many times I’ve heard “my vest feels weird” or “the heating is uncomfortable.” Nine times out of ten, they’re wearing it wrong from the start.
Never put your heated vest on bare skin. Ever. Those heating elements need a barrier. A thin long-sleeve shirt. A thermal top. Something. Put anything between the vest and your skin. This creates proper heat distribution. Without it, you get uneven hot spots that feel strange against your body. Some areas get too warm while others stay cold.
Your base layer does more than protect your skin. It creates an air pocket that the heating elements warm up. That warmed air then spreads across your torso. Skip this step and the heat transfers in patches. You lose about 30% of heating efficiency right off the bat. That’s like throwing away a third of your battery charge for no good reason.
Plus there’s the moisture problem. Your body sweats even in cold weather—especially if you’re doing any kind of work or activity. That sweat hits the vest’s interior and has nowhere to go. You end up clammy and uncomfortable. A moisture-wicking base layer pulls that dampness away before it becomes a problem.
Mistake #2: Blocking Airflow With Too-Tight Outer Layers
Your heated vest needs breathing room to work right. I see this mistake all the time during extreme cold snaps. People think “colder weather = more layers = tighter fit.” Wrong.
Don’t squeeze your heated vest under a jacket that’s two sizes too small. This restricts airflow around the heating zones. Those heating elements warm the air around them. That air needs space to circulate and distribute heat across your core. Compress everything down tight and you create dead zones where heat can’t reach.
The sweet spot is snug but not restrictive. Your vest should sit close to your body with your outer jacket fitting over it without strain. You should be able to move your arms and twist your torso without feeling bound up. Think of it like building a campfire—you need oxygen flow for it to work right. Same principle applies here.
Restricted airflow also forces your heating elements to work overtime. They’re trying to warm an area but can’t distribute that warmth the right way. Your battery drains faster. Your vest cycles on and off more often. And you still feel cold in spots. It’s a losing situation all around.
Mistake #3: Ignoring Battery Placement and Temperature
Your battery hates temperature extremes. Period. Yet most people shove it in that internal pocket and forget about it. This causes serious problems with both safety and performance.
Batteries work best between 68°F and 113°F. Push outside that range and your runtime takes a nosedive. Field studies show that temperature swings of just 5-8°F cause uneven aging across battery cells. What does this mean for you? Your battery that used to give you 8 hours on low now makes it 5 hours. And you have no idea why.
Here’s what happens: Let your battery get too hot—say you’ve got your vest cranked on high and it’s sitting too close to a heating element—and you’re damaging it with every use. Push that battery above 113°F often and you’ll see 6.7% degradation after just 200 charging cycles instead of the normal 3.3%. That’s double the wear and tear.
Cold batteries have the opposite problem. Take your vest out of a freezing truck and turn it on right away? Your battery can’t deliver full power when it’s that cold. Runtime drops fast. And if you make the mistake of charging a frozen battery—something I’ve seen plenty of people do—you risk permanent damage to those lithium-ion cells.
Check your battery temperature during use. Touch the pocket where it sits. Warm is fine. Hot to the touch means turn your vest down a setting or two. Give that battery a break so it can do its job right.
Mistake #4: Running the Wrong Heat Setting for Your Activity Level
This mistake wastes more battery power than just about anything else. People treat their heated vest like an on-off switch. High heat or nothing. That’s not how you get the best performance.
Your body generates its own heat when you’re active. Chopping wood? Shoveling snow? Hiking uphill? You’re creating warmth from all that movement. Turn your vest on high during these activities and you’re cooking yourself. You’ll overheat, start sweating, then turn the vest off. Five minutes later you’re freezing again because you stopped moving. It’s an exhausting cycle.
Match your heat setting to your activity level and the temperature. Start on low. Always. Even if you think you need more. Give your body 10-15 minutes to adjust. Still cold? Bump it to medium. Reserve high setting for standing still in brutal cold or sitting on a chairlift.
Here’s a real-world example that drives this home: A 7.2V/5000 mAh battery on high gives you about 2.5 hours of heat. That same battery on low stretches to 9 hours. That’s close to four times longer. For outdoor workers doing an 8-hour shift, running on low instead of medium makes the difference between one battery or needing to swap mid-day.
The “pulse method” works great for most situations. High for 10 minutes to warm up fast. Medium to get comfortable. Low to maintain that warmth. Your battery stays in its optimal temperature range. You stay comfortable. And you’re not wasting power pushing heat you don’t need.
Mistake #5: Skipping Basic Maintenance and Storage
Your heated vest isn’t a “set it and forget it” piece of gear. Treat it like your work truck or your good hunting rifle—it needs regular attention to perform right season after season.
The biggest mistake people make happens in the off-season. They toss their vest in a closet with the battery at full charge. Maybe it sits in a hot garage all summer. Come November, they pull it out and wonder why it won’t work. Here’s why: storing batteries at full charge in warm conditions destroys capacity from 98% down to 60% in just three months. You’ve killed more than a third of your battery’s ability to hold a charge by doing nothing.
Store your battery at 40-60% charge in a cool, dry place. Not the garage. Not a shed. Pick somewhere with stable temperatures. Before the season starts, charge it to 100% and run one complete discharge cycle. This resets the battery management system and gives you accurate runtime estimates.
During the season, basic care keeps everything running smooth. Check the battery connections for dirt or corrosion. Make sure the internal pocket isn’t building up lint or debris. Inspect the heating elements for any damage. These simple checks take five minutes and prevent big problems down the road.
And here’s something most people never think about: never charge a frozen battery. Bring your vest inside after outdoor use. Let the battery warm to room temperature before plugging it in. Charging below 32°F can damage lithium-ion cells for good. I know it’s tempting to charge right away so it’s ready for tomorrow. Resist that urge and let it warm up first.
Field data shows that facilities monitoring battery health see 35% longer average battery life. You don’t need fancy monitoring equipment. Just pay attention. Does your vest take longer to heat up? Is runtime dropping on the same setting? Does the battery feel too hot during normal use? These are warning signs that something’s off.
Your heated vest is an investment. These five mistakes—wearing it wrong, blocking airflow, ignoring battery temperature, using incorrect heat settings, and skipping maintenance—are all avoidable. Fix them and you’ll get years of reliable warmth instead of frustration and replacement costs.
Conclusion
Heated vest layering is simple. Find the right balance between warmth and flexibility. Here are the key points: wear your heated vest over a thin base layer (never on bare skin). Keep it under your outer jacket for better heat retention. Start with lower temperature settings, then adjust up as needed. These tweaks turn cold mornings into comfortable ones.
Your heated vest fit should feel snug but not tight. You need to move your arms freely while staying warm. Spend five minutes testing your temperature zones and battery placement at home. This saves you from adjusting controls in freezing weather later.
Want to beat the cold? Use the three-layer system we covered. Test your settings at home first. Adjust as you go—no need to get it perfect right away. Winter gets a lot more comfortable this way. You might even enjoy those cold mornings. Now get out there and stay warm!